The Main Title List is your entry point to ONIXEDIT Cloud. Using it, you can
- Select an ONIX metadata catalogue to work with;
- Import/Export your books and ebooks metadata;
- Upload or Download your ONIX file;
- Search for specific titles;
- Modify or Create new ONIX titles.
Here is what the main title list looks like:

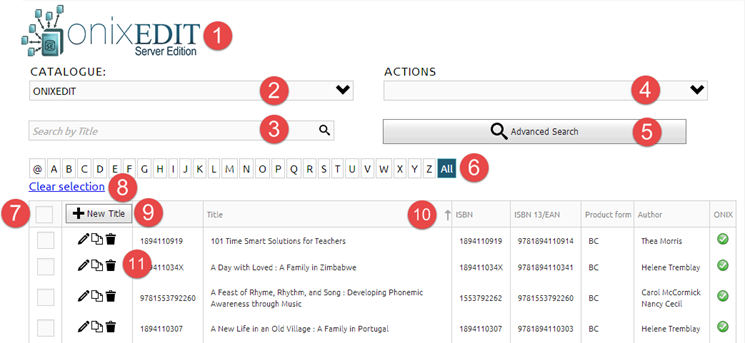
- The ONIXEDIT Server Edition or ONIXEDIT Cloud logo: Click on this logo anytime to get back to the main title list.
- Catalogue drop-down list: If you have more than one ONIX metadata repository, use this drop-down list to select the catalogue you want to show in title list. A catalogue is like a distinct ONIX file and each one may contain one or several ONIX titles. For example, if you have chosen to maintain distinct ONIX 2.1 and ONIX 3.0 metadata, you will then have one catalogue for each standard. You may have more if you are using ONIXEDIT Server Edition.
- Search by title textbox: If you want an easy and fast way to search books by their title, you should use this control. Just type the sequence of characters you are searching for and press "Enter". ONIXEDIT Cloud main list will then show you the corresponding books having the sequence of characters anywhere in their title.
- Action combo box: This is a list of actions you can take on your ONIX titles (selected titles or complete list). For more information on the Action combo box, see the Applying actions to titles subtopic.
- Advanced Search: If you need to search by more specific criteria, click on this button to show the advanced search panel. For more information on the Advanced Search tool, see the Searching titles subtopic.
- Title Index Control: Click on any letter in this index to see the books with a Title that begins with this letter in the list. The @ index option allows you to see the titles that begin with a number or a punctuation character. Click on the All index option to get back to the full title list of the catalogue.
- Title Selection Control: This control allows you to select one or more titles prior to applying an action from the Actions combo box. Using the Title Selection Control in the header of the list, you will select all the titles shown in the current page (10 titles per page). You can also select each title individually by clicking on the Title Selection Control at the left of each title.
Important tips #1: If you want to apply an action to all of your catalogue's titles, don't select any (or clear the selection using control #8) and apply the action you want. ONIXEDIT will then ask you if you want to apply the action to all of your titles.
Important tips #2: Your selection will remain as it is until you change your current catalogue or you log off.
- Clear selection link: Click on this link to reset the selection so no more titles will be selected (also clears selection on all pages of the list).
- New Title button: Click on this button to add a new ONIX title in your current catalogue.
- Main Title List Headers: Click on any column's header to sort by that column. A first click will sort ascending, a second will sort descending.
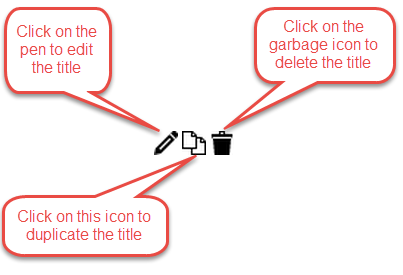
- Individual title controls: The second column of the main title list provides individual title controls. Use the pen (or double-click the title) to edit the corresponding title. Use the double sheet icon to create a copy of the title and go to the Edit title form to fill in required new values. Use the garbage icon to delete the corresponding title from the current catalogue.

The last column of the Main List indicates if the corresponding titles comply with the ONIX standard. Titles having a green check mark are compliant while those presenting a red X are not:


