Sending ONIX Files
One of the main reasons for using the ONIX standard is without a doubt transmitting bibliographic commercial and promotional information about your books to your partners in a universal language that can be understood by everyone. This is the primary reason for the existence of the ONIX standard. Sending an ONIX file may be done manually (Please see the section Sending a File to a Partner by Email ). But it is preferable and easier to let ONIXEDIT do it for you especially if you have the Media Space Service. Indeed, ONIXEDIT offers a simple and powerful automatic transmission tool through the function Transmit to Partners from the Onix menu (F9). This function will show a dialogue similar to the following:

Using this dialogue, you can define which of your partners are intended to receive your ONIX files, as long as they each have an ftp server dedicated to this purpose. The integrated ONIX transmission tool in ONIXEDIT uses the FTP protocol to send files. This is a standard that is generally recognized and used in the industry.
Normally your trading partners should make an FTP account available to you. Please communicate with each of them to ask for an account. This is information which should be input in the trading partners list in ONIXEDIT. For each, you need to define the following information:
• Send file to this partner. This check box indicates which are the partners to whom you wish to send your metadata file. When you click on the Transmit n Title(s) to Selected Partners button, only those partners having this check box checked will receive the file.
• Name. Name of your trading partner. This is a required field.
• FTP Server. URL address of the FTP server made available to you by your trading partner in order to receive ONIX files. If you need to specify a particular port, you can add it at the end of your FTP server address preceding it by ":". For instance "ftp.acme.com:12345". This is a required field.
• Username. The user name of your FTP account as sent to you by your trading partner. Required field.
• Password. The password for your FTP account as sent to you by your trading partner. Required field.
• Destination path. This is an optional field. Your trading partner will tell you if you should place your files in a particular location, and if this is the case, you should input the exact name of the location here.
• Protocol. You must choose between regular FTP protocol or Secure FTP (SFTP) depending on the type of FTP server used by your trading partner.
You can also define additional options:

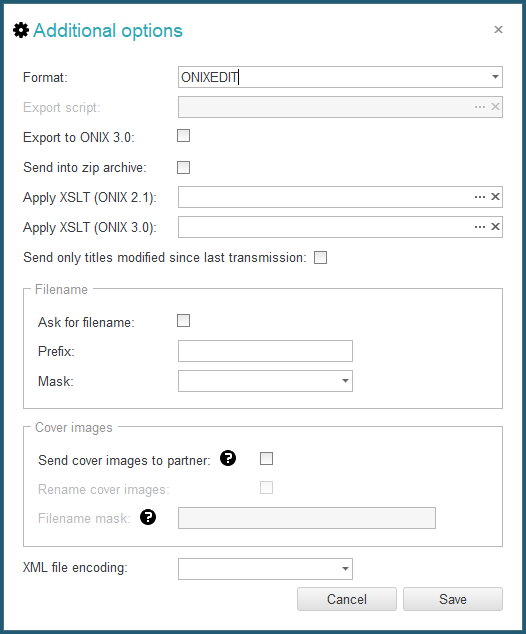
The Additional Options dialogue will allow you to set the following:
• Format. For ONIX 2.1 files, you have to choose one of the six Specialized Formats supported by ONIXEDIT. For each of these formats, you have the choice of long tag names using the first five formats on the scrollable menu, or short tag names using the last five formats on the scrollable menu. ONIX supports these two different format types to achieve exactly the same results. The only difference between these two formats is that the short tag format creates files which are smaller but also more difficult for a human being to interpret, if you try to read them. But for a computer, there is no difference. The choice of these two formats depends simply on your trading partner’s preferences. If you are using ONIX 3.0 files, you will only have the choice between short and long tags. As an option, you can also choose to export your metadata files to a flat file or Excel file (EXCEL/FLAT) using an ONIXEDIT export script. You will then have to enter the path name of your export script and ONIXEDIT will automatically convert your ONIX file using this script before sending it to your trading partner. Please, read section Exporting to a Flat File or Excel to learn how to create an Export Script.
• Export script: You can use ONIXEDIT to automatically export your ONIX file to a flat file or Excel file for your partners that do not support the ONIX standard. You must have ONIXEDIT Pro or the Import/Export option to use that function. The Export Script selector will be activated only if you choose the "EXCEL/FLAT" format in the Format drop-down list. Then, you must select a valid ONIXEDIT export script.
• Export to ONIX 3.0: This option is available when you want to transmit an ONIX 2.1 file. If checked, ONIXEDIT will automatically convert titles to ONIX 3.0 for that specific trading partner. If you intend to transmit ONIX 3.0 files automatically converted from an ONIX 2.1 file, it is highly recommended to activate the special validation option "Validate ONIX 3.0 mandatory elements" to ensure the resulting ONIX 3.0 will be valid. See section Convert an ONIX 2.1 file to ONIX 3.0 for more details.
• Send into zip archive: When checked, the resulting ONIX file will be compressed in a .zip archive before being sent to your partner.
• Apply XSLT: Apply an XSLT file to make the desired changes to the resulting XML file.
• Send only titles modified since last transmission: If you activate this option, ONIXEDIT will automatically keep track of titles already sent to each of your partner. Each time you will use the Transmit to Partners function having this option activated, ONIXEDIT will automatically transmit modified or new titles only from your titles selection. If ever you need to clear the transmission history for a specific partner, you will simply have to click on the delete icon at the right of the option. Once the history cleared, the partner will receive the complete title selection at next transmission.
• Ask for filename: If you prefer to give a name for each file by yourself, then you should check this option and at transmission time, ONIXEDIT will prompt you to give a filename for each of your trading partners.
• Filename Prefix: This is an optional field. If you define it, the value entered will be used by ONIXEDIT as a prefix to the file name for your trading partner.
• Filename Mask: This is an optional field. You could use it to define the template that will be used by ONIXEDIT to generate the ONIX file name for your trading partner. If you leave this field blank, the following mask will be applied: yyyyMMddHHmmss. You could define your mask with any alphanumeric characters except the following: ", \, /, ?, :, *, >, < and |. Indeed, those characters can't be used for file name on many operating systems. You could also use the following special sequences:
• yyyy will be replaced by current year;
• MM will be replaced by current month;
• dd will be replaced by current day;
• HH will be replaced by current hour;
• mm will be replaced by current minutes;
• ss will be replaced by current seconds.
For example, if "ONIX_" is defined as the Filename Prefix and you enter "yyyy_Hello_MMdd" as the Filename Mask and the current date at transmission time is May 15, 2010, then the resulting file name will be "ONIX_2010_Hello_0515.xml".
• Send Cover Images to partner: If you check this option, ONIXEDIT will download your cover images from your Media Space (or any other external source) and send it to your partner's FTP site. Also, references to your cover images in the ONIX file sent to your partner will be adjusted accordingly.
• Rename Cover Images: If you check this option, you will be able to define a filename mask (next field) that will allow ONIXEDIT to automatically rename your cover images following a particular template according to requirements of your trading partner.
• Filename mask: In this field, you will define the filename template that will be used by ONIXEDIT to name your cover image files before sending it to your partner. This template must be defined using a special tag among [ISBN-10], [ISBN-13], [EAN] or [REF] and any valid filename characters. You don't have to type the file extension. As an example, if you define the filename mask "ONIXEDIT_[REF]_cover" it will become "ONIXEDIT_12345_cover.jpg" for a JPG cover image associated to title having Record Reference 12345.
There are also 2 special buttons in each partner definition record:
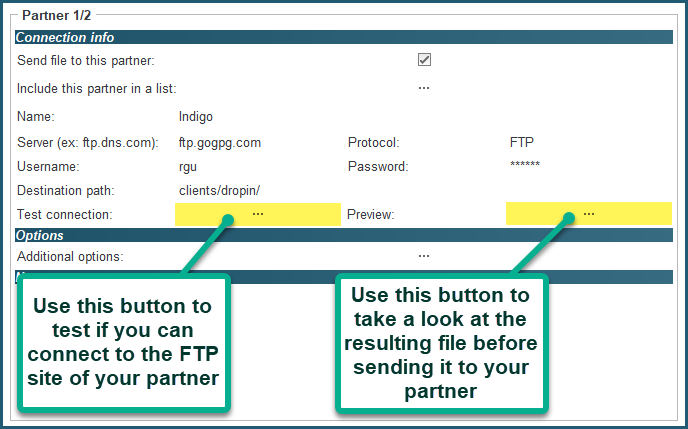
• Test Connection. After defining a new trading partner, use this button to verify that the connection to the FTP server is possible and valid. Thus, in case of connection failure, you will have immediate feedback. In this case verify that the parameters of your account are correct in all details. Most of the time, the problem is a typographical error. If, on the other hand, the parameters conform exactly to the information furnished by your trading partners, please communicate with them to verify the status of your FTP account.
• Preview. The Preview button will allow you to look at the resulting metadata file as it will be sent to your trading partner without having to send it.
Above the list of trading partners, you will see 3 options:
• Replace “ToCompany” (in ONIX Message header) by partner's name. This is an option allowing you to define the name of your trading partner automatically, in the header of an ONIX file, as the recipient of the file (tag ToCompany).
• Default Partner File Prefix. The files which are to be sent to your business partners will be named with the date and time of file creation (yyyyMMddHHmmss.xml), for example 2090831105034.xml. If you define a prefix, it will be added at the beginning of all the files you produce. For example, if you define the prefix "GPG", the file in the preceding example will become GPG20090831105034.xml. This is the same as the Prefix column in the trading partners list, but acts as a default value for all partners. If something is defined in the partners' list, this will have priority over the default prefix value.
• SupplyDetail transfer mode: If the checkbox “Transmit only data associated with each partner name” is chosen, then every partner will receive a distinct ONIX file limited to the SupplyDetail records concerning them. To define a SupplyDetail record for a specific partner, you should first have the Advanced Form of the PRO version (in options for ONIXEDIT regular edition). If no SupplyDetail record is defined for this partner, the resulting ONIX files will not include any SupplyDetail component. This allows you to target precise commercial information to be transmitted to each partner, without having to transmit your entire metadata contents to everyone.
Once you have defined all your trading partners, you can use the automatic file transmission tool as follows:
1. First open your ONIX file with ONIXEDIT
2. Select the files to be transferred from the main list. You do not have to make a selection if you want to send all the titles contained in one file.
3. Click on the Transmit to Partners button in the toolbar, or activate the Transmit to Partners function from the Onix menu (F9).
4. Make sure that the number of titles to send (inserted in the Send n Titles to Selected Partners button) corresponds to what you want to send.
5. Check the trading partners to whom you want to send an ONIX file.
6.Click on the Send n Titles to Selected Partners button and finally, look in the contents of the processing journal at the bottom of the window to make sure that there have been no transmission errors.
If you try to send a file containing titles with errors, you will be warned to correct these errors first if the option "Allow transmission of invalid titles" in Preferences module is not checked. If you try to send titles having external files that are not synchronized in your media space (Please see the Media Space section) you will be asked to use the function Upload Media Files as a preliminary step, so that these files will be available to your business partners.
Partner Lists
You can create lists and add partners to these lists to quickly select a group of partners to send your books to. Here's how you can interact with these lists:

• The Manage partner Lists button: Press this button to bring up a dialog that will allow you to create new lists or delete existing lists.
• The Select partners in a list... drop-down menu: This drop-down menu will display all your created lists, you just have to select one of them so that the box "Send file to this partner" is checked for all the partners of this list.
• The Include this partner in a list button: Press this button to add this partner to one or more of the lists you have created.
• The Uncheck All button: Press this button to uncheck the "Send file to this partner" box for all your partners.
Sell your books with Shopify
See the section on the ONIXEDIT Bookstore app for Shopify to learn more about how to feed your Shopify store directly from ONIXEDIT.